
[How To] Ten Count Smartphone Game “Another Days”
After the release of the Ten Count smartphone game “Another Days” for Ameba (a Japanese social media/blogging platform) got postponed again and again, the developers dropped the bomb and released the game without any prior notice yesterday. Instead of making it an app on its own, the game was built as a website and can be played if you have an Ameba account. In this short(!) How-To I’ll show you how to make an account and how the basic functions of the game work. The game works pretty much like your regular Dating Sim for the story part, so there’s a lot of clicking and reading involved, but the bad news for some of you is that the game is entirely in Japanese. I’m not sure if anyone will translate the game’s main story or not, but I’m too busy and will not.
Create your Ameba account
First you need to click on this link: a1-341-6-sp.arithgame.jp/index.php
From there you’ll scroll down a little and see this page:

The easiest way to create a new account is to login with facebook/twitter/whatever else is available on there. Creating an Ameba account is free, you will only be charged if you want to buy extra content.
After you’ve given Ameba permission to access the info of your social media account for the login, you’ll be prompted to complete your profile:

Your icon and username will be taken from your social media. Next are your date of birth (year/month/day!), gender (the first one is female, the second one is male) and the last field is for your email address. Once you’ve completed inserting your information you’ll be able to press the grey button and proceed to the game’s page.
Tutorial
Once you’ve finished making your account, you’ll be directed to this page:

Click the green button to get to the game’s page. Click the pink button on the next site to start the game:

The game will ask you how you want to be called. The first field is for your last name, the second field is for your first name:

Next you will be asked if you want to turn on the sound, this will likely increase the load times for the game, but you will be able to change your decision again later in the settings:

The options are: ON, OFF or SKIP
And now you finally get to start with a bit of story!

Navigating through the conversations is done by tapping the screen, if you are prompted to make a decision during the conversation, you can do so by tapping on it directly.
Your first task in the game is to dress up Shirotani-san! You can choose his facial expression and which shoes he’s supposed to wear with his usual suit!

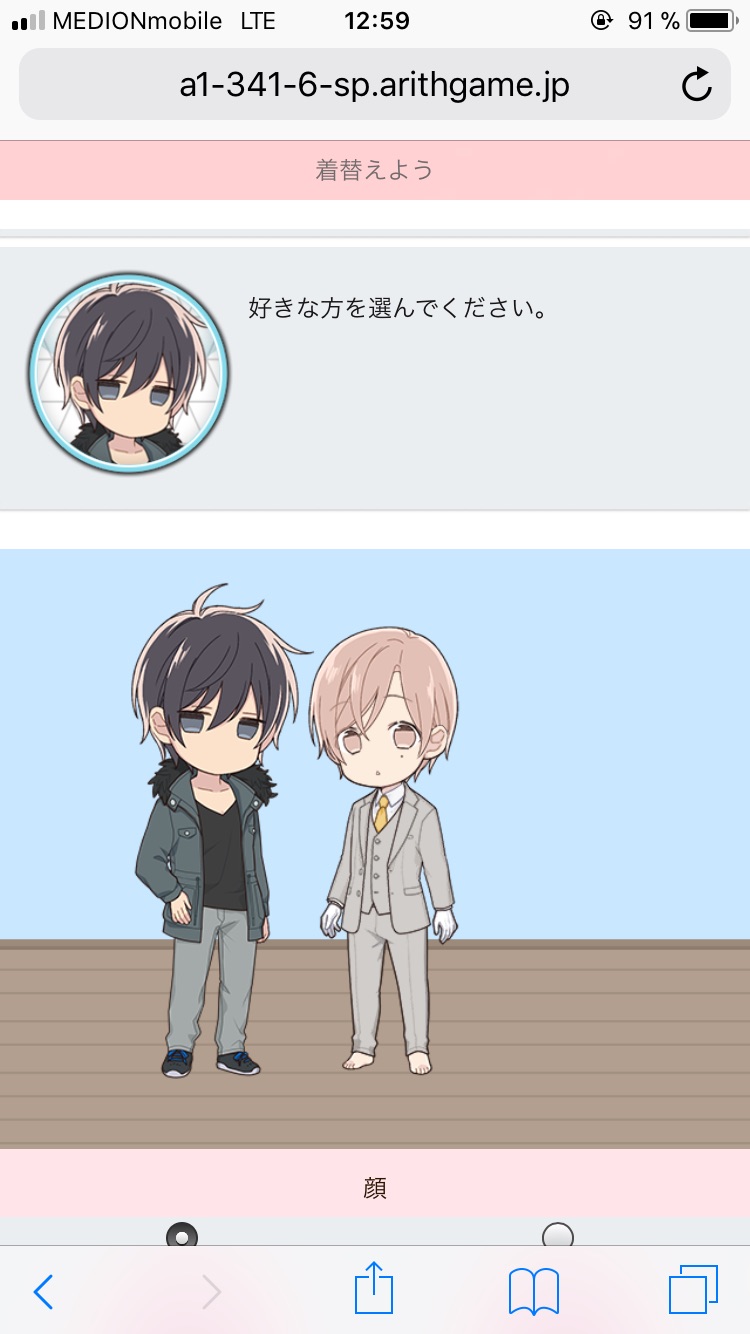


Click the upper button on the last page to go with your decision, click the second button to go back and choose again.
Afterwards Kurose-kun explains that you can only dress up Shirotani-san, but you can receive other characters in various matching outfits you can add to Shirotani-san as decoration (lmao).

You’ll then receive 5 scenario tickets. These are used to proceed in the main stories. You’ll receive free tickets at 4 am Japan time per day, but they’ll expire after a day!

You can make Shirotani-san take “lessons” in order to raise his charm points. These lessons are exhausting and burn up stamina points, so you there’s only a limited number of times you can take them per day! To be very honest, I’m not very sure how they work: You’re presented with two differently dressed Shirotanis and are then supposed to click one of the two icons under them. Just know that 大成功 means success and 失敗 means failure. Sometimes if you’re successful you will sometimes receive “Dias”(?) (Google translates this as “deer”, but they’re basically in-game coins you can use to buy items) and will be able to raise your lesson level.


Then it’s time for your first mission! Your first mission is to buy Shirotani-san’s “normal coat” for 600 Dia which will increase your charm by 10 points. Well done, you did a shop!


As a reward for this you’ll receive more scenario tickets. Reward items are sent to your inbox and you can either accept them one by one by clicking the tiny pink button right next to the item, or you can be a smart person and receive them all at once by clicking the big buttons at the top or bottom of the item list.


In raising mode you can use your raise points to raise Shirotani-san! By raising your affection level in the examination room you’ll be able to receive special avatars and voice scenarios! Your affection level also helps you make up for wrong decisions you make during the story play. These invested affection points will not be reset if you switch between two stories, but there are special reset tickets which will be able to do that for you if you’re not satisfied with your progress.


It’s then time for you first lesson. As previously explained, you will see two sometimes differently dressed Shirotanis and have to choose one of the two icons below as your lesson partner to raise your “Ten Count Level”. Below the two icons you will see your left stamina points and how many stamina points will be deleted during the lesson in the brackets.


Afterwards Shirotani-san explains that during the story play your lesson level influences if you will enter the normal ending route or the happy ending route of the story. Which ending you receive depends on your choices during the story, your lesson level and your avatar’s dress up which will gain you items needed for the story’s progress.


The game’s twitter account mentioned earlier today that you will receive bonus stills for completing both endings!
Congratulations, you’ve completed the tutorial!

How To Play
After completing the tutorial you get to choose one of two storylines for the story mode: Shirotani Tadaomi: Lost Child (top) and Shirotani Tadaomi: Dinner (bottom). Confirm your choice by a click on the pink button, change your choice by a click on the blue button.


There are a bunch of items you might receive after this, they’re free login bonus items you will receive for logging in for days in a row and items that are given out during campaigns. While I’m writing this post you will receive a complete wedding dress up set to celebrate 80,000 pre-release registered users (The set also comes with a dressed up Kurose-kun)! You will be able to accept the items you received in your inbox.
Here’s what your main page looks like. In the top bar you see your icon, the name of the story you chose, your current progress in the story, your affection level in the heart and a menu button. Under it you see your current dress-up, the present button in the top right corner is your inbox where you can accept and receive items. Under that are the buttons which will get you to the lesson mode, raising mode and story mode.

The menu has the following buttons:
My Page, [in preparation]
Shop, Chip, Gacha, Dress up
My Data, Inventory, Scenario album, Change route
Friends Top, Ranking, Login sheet, Change name
Help

Gacha currently has two themes: Japanese tea house in spring and Ornaments!

After choosing one theme you’ll learn how long the theme will be available, the Japanese tea house in spring theme will be available until April 8, 2018. Under the pink button you’ll see how many gacha tickets you have left.
Click the pink button to turn the gacha, the left grey button to view the items and the right button to buy tickets (probably with real money, I’m not sure how you buy items on Ameba though…).
After clicking the pink button you need to confirm that you want to spend your gacka ticket.
If you scroll down you’ll see a list of the theme’s available items divided into a first section with rare items and a second section with normal items. Scroll down a bit further to see a list that tells you how likely each item will drop. (I suggest copy-pasting this list into Google Translate)


Dressing up Shirotani-san is fairly easy. Under the avatar you see how high you charm points are and how many slots in your closet are occupied. Seems like you can only carry 20 items, but since some of them may be relevant to the story you need to choose well which ones to keep and which ones to delete.
The two pink button direct you to either the avatar shop (left) or the gacha (right).

To dress Shirotani-san in an item, click on it and choose the bigger pink button. Choose the smaller button to throw away this item!
To take off an item you’re already wearing just click on the item and then the one button displayed.
When you click on an item, you’ll also see how many charm points the item will add to your outfit.


And lastly, to change your sound setting, go to My Data in the menu, then click the grey button at the bottom of the page and click the grey button on the following page to turn on the sound.


I hope this will be of help to some of you guys!
One Comment